
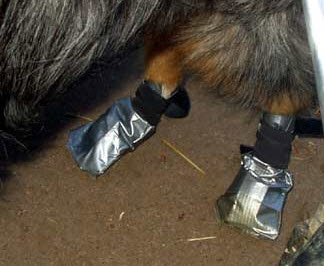
How to Make Dog Boots Out of Duct Tape? To make dog boots out of duct tape, first measure your dog’s paws and cut strips of duct tape. Then, wrap the tape around each paw, ensuring a snug but comfortable fit.
Dog boots provide essential protection for your furry friend’s paws, especially during harsh weather or rough terrain. Creating your own boots using duct tape is a simple and cost-effective solution. Not only does this DIY project save money, but it also allows you to customize the fit for your dog’s unique paws.
Duct tape is durable and water-resistant, making it an ideal material for this task. Whether you’re heading out for a walk on hot pavement or snowy trails, homemade boots can keep your dog’s feet safe and comfortable. Enjoy the bonding experience as you craft these practical accessories together.
Table of Contents
Introduction To Diy Dog Boots
Protecting your dog’s paws is essential. Harsh weather and rough terrain can hurt their feet. Making dog boots from duct tape is a fun and easy solution. This DIY project is budget-friendly and effective. Your furry friend will appreciate it!
Why Choose Duct Tape?
Duct tape is a versatile material. Here are some reasons to use it for dog boots:
- Durability: Duct tape can withstand wear and tear.
- Waterproof: It keeps your dog’s paws dry.
- Lightweight: Your dog will hardly notice them.
- Customizable: You can make any size or shape needed.
Benefits For Your Pooch
Making dog boots from duct tape offers several advantages:
| Benefit | Description |
|---|---|
| Protection | Shields paws from sharp objects and hot pavement. |
| Comfort | Soft material reduces friction and irritation. |
| Increased Mobility | Helps dogs walk easily on slippery surfaces. |
| Easy to Make | Simple materials and steps make it a fun project. |
With these benefits, your dog will love their new boots!
Materials Needed
Creating dog boots from duct tape is simple and fun. You need a few basic materials. Let’s look at what you need.
Choosing The Right Duct Tape
Selecting the right duct tape is crucial. Not all duct tapes are created equal. Here are some key points:
- Width: Choose at least 2 inches wide.
- Color: Bright colors make your dog visible.
- Strength: Pick a heavy-duty option for durability.
Brands like Gorilla Tape or Duck Brand work well. They provide excellent grip and waterproofing.
Other Essential Supplies
Besides duct tape, gather these essential items:
| Item | Purpose |
|---|---|
| Scissors | To cut the duct tape into strips. |
| Measuring Tape | To measure your dog’s paws. |
| Felt or Fabric | For added comfort inside the boots. |
| Marker | To mark measurements on the tape. |
| Dog Treats | For positive reinforcement during the process. |
Gather these items before starting. This will make the process smooth and enjoyable.
Measuring Your Dog’s Paws
Measuring your dog’s paws is essential for creating the perfect duct tape boots. Accurate measurements ensure a comfortable fit. Follow these simple steps to get it right.
Tips For Accurate Measurements
- Use a soft measuring tape.
- Measure your dog while standing.
- Keep their paw flat on the ground.
- Measure both width and length.
- Repeat measurements for accuracy.
To measure length, start at the back of the paw. Measure to the tip of the longest toe. For width, measure the widest part of the paw. Write down each measurement for reference.
Understanding Paw Size Variations
Dog paw sizes can vary greatly. Factors include breed, age, and activity level. Here’s a quick guide:
| Dog Size | Paw Length (inches) | Paw Width (inches) |
|---|---|---|
| Small (e.g., Chihuahua) | 2 – 3 | 1.5 – 2 |
| Medium (e.g., Beagle) | 3 – 4 | 2 – 3 |
| Large (e.g., Labrador) | 4 – 5 | 3 – 4 |
| Giant (e.g., Great Dane) | 5 – 6 | 4 – 5 |
Check your dog’s breed for expected sizes. Each dog is unique, so adjust as needed.

Credit: www.instructables.com
Cutting And Preparing The Duct Tape
Creating dog boots from duct tape starts with proper preparation. The right cuts ensure durability and comfort for your pet. Follow these steps for best results.
Creating The Pattern
First, make a pattern for the boots. Use paper or cardboard for this step. Follow these simple steps:
- Measure your dog’s paw width.
- Measure your dog’s paw length.
- Add extra length for the boot’s top.
- Draw the pattern on the paper or cardboard.
- Cut out the pattern carefully.
Ensure the pattern fits snugly but not too tight. This will help keep your dog comfortable.
Cutting Techniques For Durability
Use the right cutting techniques to enhance durability. Here are some tips:
- Use sharp scissors for clean cuts.
- Cut duct tape strips about 2 inches wide.
- Layer the strips for added strength.
Consider these cutting techniques:
| Technique | Description |
|---|---|
| Single Cut | Cut one piece for each boot. |
| Double Cut | Layer two strips for extra support. |
| Rounded Edges | Round the edges to prevent tearing. |
These techniques will make your dog boots more durable. Good cuts lead to strong, lasting boots.
Assembling The Dog Boots
Creating dog boots from duct tape is simple and fun. The process involves gathering materials and following steps to make a secure fit. Let’s break down the assembly into clear, easy steps.
Step-by-step Assembly Guide
- Gather your materials:
- Duct tape (a sturdy type)
- Scissors
- Fabric (optional for comfort)
- A measuring tape
- A pen or marker
- Measure your dog’s paw:
- Place your dog’s paw on paper.
- Trace around it with a pen.
- Measure the width and length of the paw.
- Cut the duct tape:
- Cut two long strips of duct tape.
- Each strip should be twice the length of your dog’s paw.
- Create the boot shape:
- Fold the strips in half, sticky sides together.
- Press firmly to stick the edges.
- Ensure there are no gaps for dirt to enter.
- Form the boot:
- Wrap the boot around your dog’s paw.
- Secure it with more duct tape if needed.
- Make sure it’s snug but not tight.
- Test the fit:
- Let your dog walk around.
- Check for comfort and movement.
Ensuring A Comfortable Fit
Comfort is key for your dog’s happiness. Follow these tips to ensure a great fit:
| Tip | Description |
|---|---|
| Check the Size | Use accurate measurements to cut the tape. |
| Use Soft Fabric | Line the inside of the boot for comfort. |
| Adjust Tightness | Avoid making the boot too tight or loose. |
| Test Movement | Let your dog walk and play with the boots. |
Monitor your dog while they wear the boots. Ensure they move easily. A comfortable fit keeps your dog happy and protected.
Customizing The Boots
Customizing your dog boots adds style and improves performance. Duct tape is versatile. It lets you create unique designs and enhance functionality.
Adding Personal Touches
Make your dog boots stand out with these ideas:
- Colors: Use different colored duct tape for a fun look.
- Patterns: Mix and match patterns for creativity.
- Initials: Write your dog’s name or initials using a marker.
- Stickers: Add stickers for extra flair.
Let your dog express their personality. Personal touches make the boots unique.
Improving Functionality
Functionality is key for comfort and protection. Consider these enhancements:
| Enhancement | Description |
|---|---|
| Padding: | Add soft fabric inside the boots for comfort. |
| Waterproofing: | Use waterproof duct tape for wet conditions. |
| Reflective Strips: | Add reflective tape for visibility at night. |
Choose enhancements based on your dog’s needs. A well-customized boot improves safety and comfort.
Putting The Boots To The Test
Testing your homemade dog boots is crucial. It ensures they fit well and provide protection. Start with simple indoor trials. Then move to outdoor adventures. This method helps evaluate their performance in different environments.
Indoor Trial
Begin indoors to see how your dog reacts. Follow these steps:
- Place the boots on your dog’s paws.
- Observe their movements.
- Watch for signs of discomfort.
- Allow them to walk on different surfaces.
Check for these factors:
- Comfort: Does your dog seem at ease?
- Fit: Are the boots snug but not too tight?
- Stability: Do they stay on during movement?
Use a quiet space for the trial. Avoid distractions. This helps your dog adapt to the boots.
Outdoor Adventure
Take your dog outside for a real-world test. Choose a safe area like a park. Follow these steps:
- Let your dog walk on grass, dirt, and pavement.
- Monitor their reaction to different terrains.
- Check for any wear on the boots.
During the outdoor adventure, pay attention to:
| Factor | What to Observe |
|---|---|
| Grip | Does your dog slip or slide? |
| Protection | Are their paws safe from sharp objects? |
| Durability | Do the boots hold up against rough surfaces? |
After the adventure, check your dog’s paws. Look for any redness or irritation. This ensures the boots are effective.
Credit: petdiys.com
Maintenance And Care
Keeping your dog’s duct tape boots in good shape is important. Proper maintenance ensures they last longer. Regular care keeps your dog comfortable and safe.
Cleaning Tips
- Remove dirt and debris after each walk.
- Use a damp cloth to wipe the boots.
- For tough stains, use mild soap and water.
- Air dry the boots completely before the next use.
Check the boots for wear and tear. Look for peeling tape or loose edges. Clean boots help prevent irritation on your dog’s paws.
When To Make A New Pair
Know when to replace your dog’s duct tape boots. Look for these signs:
| Sign | Action |
|---|---|
| Visible wear or holes | Make a new pair |
| Peeling tape | Replace immediately |
| Uncomfortable fit | Measure and create new boots |
| Repeated slipping off | Make a snugger pair |
Check the fit regularly. A good fit keeps your dog safe. Replace boots as needed to ensure your dog enjoys every walk.

Credit: www.wonderpuppy.net
Frequently Asked Questions
How Effective Are Duct Tape Dog Boots?
Duct tape dog boots are quite effective for temporary protection. They can shield your dog’s paws from rough terrain and harsh weather. However, they are not a long-term solution. Regularly check for wear and replace them as needed to ensure your dog’s comfort and safety.
Can Duct Tape Boots Be Reused?
Duct tape boots are generally not reusable. Once they get wet or worn down, their effectiveness diminishes. For best results, create a new pair whenever you need them. This ensures your dog has the best protection without risking any discomfort.
How Long Do Duct Tape Dog Boots Last?
The lifespan of duct tape dog boots varies based on usage. For light use, they may last a few walks. However, for more rugged activities, they can wear out quickly. Always inspect them before use to ensure they provide adequate protection for your dog’s paws.
Are Duct Tape Boots Safe For Dogs?
Yes, duct tape boots are safe for dogs when applied correctly. Ensure the tape isn’t too tight to avoid restricting blood flow. Monitor your dog for any signs of discomfort while wearing them. If any irritation occurs, remove the boots immediately and consider alternatives.
Conclusion
Creating dog boots from duct tape is a fun and practical project. It keeps your furry friend’s paws safe in various conditions. With just a few supplies, you can customize the fit and style. Try it out and give your dog the comfort they deserve while exploring the outdoors.
Happy crafting!
